
TL;DR
Placing your rig in a closet drastically reduces echo and reflections, but true soundproofing requires sealing gaps and ventilation. Smart placement and treatment make all the difference.
Ever wonder why some closet setups sound so much better than others? It’s not just about stuffing foam everywhere. The real magic lies in where you put your gear, how you treat reflections, and managing heat and airflow. You might be surprised that a closet isn’t just a hiding spot for noise — it can become a mini studio if you know what to do.
This guide reveals the secrets of making your closet rig work hard for you — cutting echo, controlling reflections, and understanding what acoustic dampening can realistically fix. No fluff, just actionable tips to get your space sounding clear and professional, whether you’re recording vocals, streaming, or running AI models.
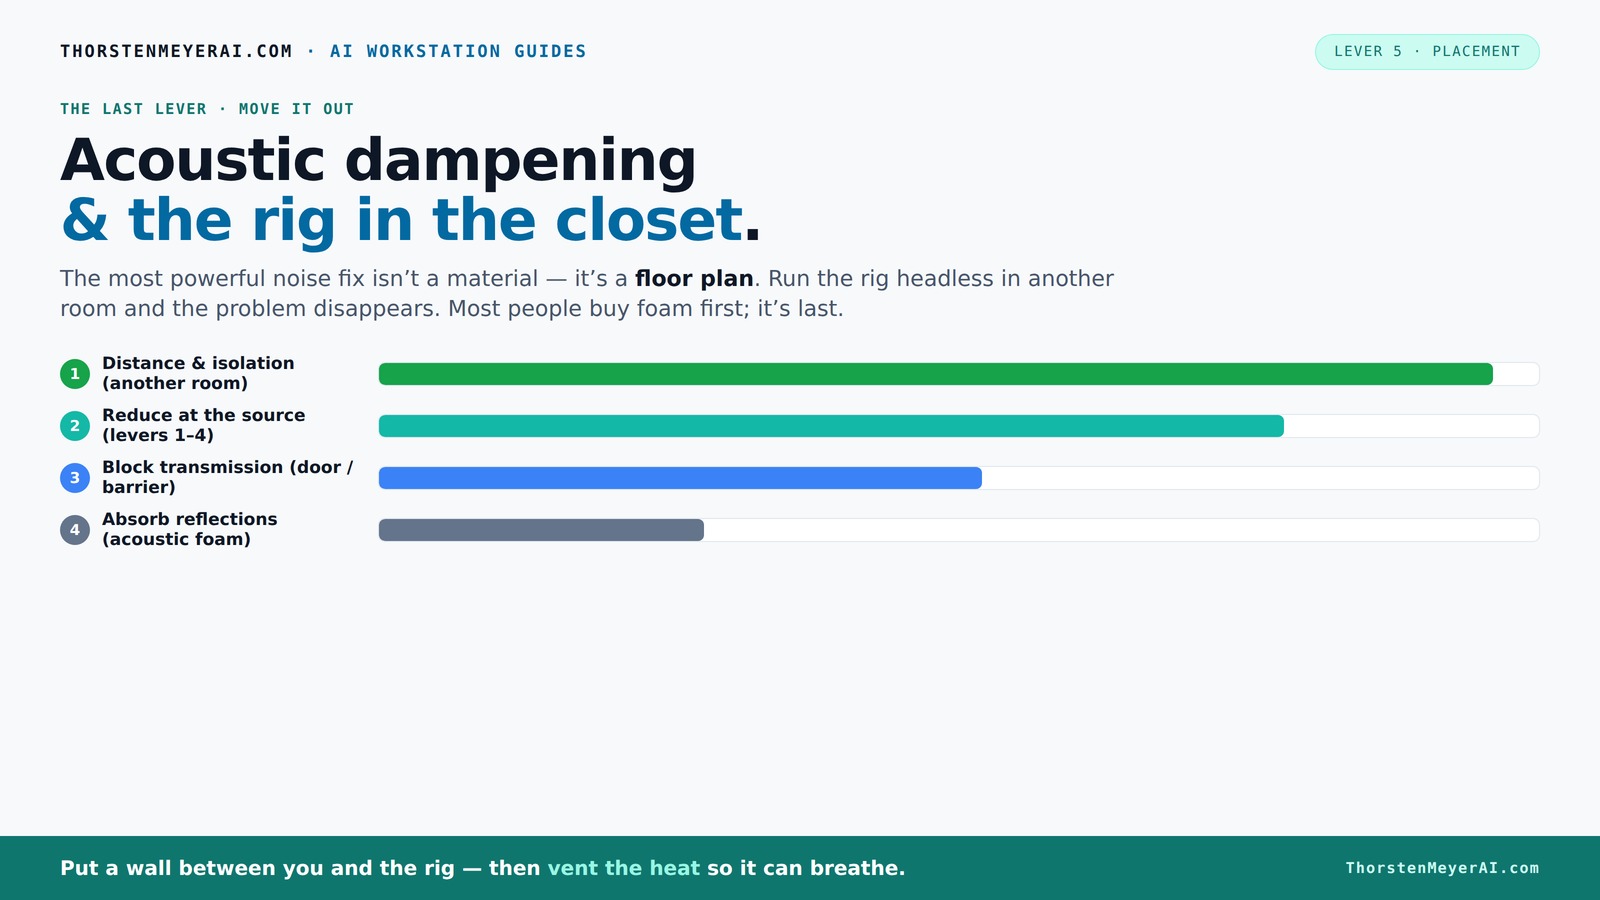
Acoustic dampening
& the rig in the closet.
The most powerful noise fix isn’t a material — it’s a floor plan. A rig you can’t hear because it’s in another room beats any amount of foam. Tap the approaches in Part 1 to see what actually works.
(another room)
(levers 1–4)
(door / barrier)
(acoustic foam)
Contain the noise, not the heat
Key Takeaways
- Your placement of the mic and treatment materials is more important than just adding foam everywhere.
- Sealing gaps around doors, outlets, and vents prevents sound leaks and improves overall acoustics.
- Proper ventilation is crucial; a sealed closet without airflow can overheat and harm your hardware.
- Bass traps and corner treatment are key in small rooms to control low-frequency buildup.
- DIY solutions can work well for tight budgets but may require upgrading for serious soundproofing.

Focusound 52 Pack Acoustic Foam Panels 1" x 12" x 12" Sound Proof Foam Panles Soundproofing Noise Cancelling Wedge Panels for Home Office Recoding Studio with 300PCS Double-Side Adhesive
Soundproofing - Acoustic foam panels triangular grooves structure for better noise absorption, helps to reduce and absorb unwanted...
As an affiliate, we earn on qualifying purchases.
As an affiliate, we earn on qualifying purchases.
Why Your Closet Setup Matters More Than Foam
Placing your rig in a closet isn’t just about hiding noise; it transforms how sound behaves. When you shift your gear into a small, enclosed space, reflections bounce off the walls differently. This change can drastically alter the acoustics, often reducing harsh echoes and making recordings sound more natural. But why does this matter? Because uncontrolled reflections create muddiness and reduce clarity, especially in small spaces. By understanding this, you can manipulate the environment to your advantage.
For example, a streamer in a tiny walk-in closet noticed her vocal recordings became instantly crisper after she moved her mic closer to the back wall and added a few blankets. These simple adjustments changed the reflection dynamics, reducing echo and making her voice sound more direct and focused. It’s not magic; it’s an understanding of how sound interacts with confined spaces. The tradeoff? While moving your gear can improve clarity, it can also introduce new issues like sound leakage or heat buildup if not managed properly. So, smart placement is about balancing these factors for optimal results.
While foam can soften echo, it doesn’t block sound transmission. The real win is controlling how sound interacts with the space — that’s where placement and strategic dampening come into play. Recognizing which surfaces cause the most reflections allows you to target your treatment effectively, saving money and space while enhancing your sound quality.

8 Pack - Bass Traps Acoustic Foam Corner, 8''x8''x12'' Black Bass Traps Corner Studio Foam, High Density and Fire-Proof Acoustic Panels Recording Studio Acoustical Treatments
Acoustic Principle- Bass Trap is a kind of sound absorbing structure specially used to absorb specific low-frequency standing...
As an affiliate, we earn on qualifying purchases.
As an affiliate, we earn on qualifying purchases.
Best Placement for Your Mic and Absorption Materials
Where you place your microphone and treatment panels makes or breaks your sound. Proper placement isn’t just about convenience; it’s about controlling early reflections and standing waves that can muddy your recordings. When you position your mic correctly, you’re effectively directing sound capture away from reflective surfaces and minimizing unwanted echoes.
Facing the mic away from reflective surfaces and aiming it at the quietest spot in your closet helps ensure cleaner recordings. For example, placing the mic about 6-12 inches from the back wall or a soft barrier reduces the chance of capturing early reflections that cause muddiness. Acoustic panels should be positioned at reflection points—these are spots where sound waves bounce directly into the mic’s path. Placing panels behind the mic and at side wall reflection points absorbs sound before it bounces back into the capsule, leading to clearer, more focused recordings.
For example, a voice-over artist placed foam on the wall behind her mic and added a blanket over the door, cutting echo by 50%. She discovered that the back wall was the biggest reflection point—treating it and side walls allowed her to capture more natural, direct sound. The implication? Strategic placement of your mic and absorption materials can significantly reduce problematic reflections, but it requires understanding your space’s unique acoustic fingerprint. This tradeoff involves balancing coverage with practicality—over-treating can deaden your sound, while under-treating leaves echoes and reflections unchecked.

Audimute Soundproofing Acoustic Door Seal Kit - Door Sweep and Seal - (Large Size)
Includes (2) Door Seals (3/16" x 1/2" x 50') and (1) Door Sweep (1/2" x 1.5" x 25').
As an affiliate, we earn on qualifying purchases.
As an affiliate, we earn on qualifying purchases.
How to Treat a Tiny Room Without Overdoing It
Small spaces are tricky because they can produce standing waves and bass buildup, leading to uneven frequency response and muddiness. To achieve a balanced sound, you need enough absorption to tame these low frequencies without making the room sound dead or unnatural. This involves understanding the physics of sound waves in confined spaces and making strategic choices.
Use 2-inch thick foam or bass traps in the corners where low-end energy tends to concentrate. Placing these traps at the points where bass frequencies tend to accumulate—such as corners—helps absorb and diffuse problematic low frequencies. Focus your treatment on the reflection points: the wall behind the mic, ceiling, and side walls. Avoid covering every inch of the space, as over-treatment can make your recordings sound hollow or unnatural. Instead, aim for a balanced approach—targeting critical reflection points and bass zones to achieve clarity without muffling your sound.
For example, a podcaster used foam panels only on the side walls and added bass traps in the corners. The result? A balanced sound that was clear and natural, without the room sounding overly dead or muffled. The key insight here is that understanding where low frequencies build and treating those points selectively creates a more even, professional sound. The tradeoff? Over-treating can reduce liveliness, while under-treating leaves bass issues unresolved. Striking this balance is essential for small room acoustics.

Ekkogo Studio Monitor Isolation Pads Premium Acoustic Foam Elevates Audio Ideal for 5 Inch Speakers Enhanced with Vibredux HD Foam for Superior Isolation
【ADVANCED VIBREDUX HD FOAM】: Experience the acoustic excellence of Vibredux HD foam with Ekkogo's Studio Monitor Isolation Pads....
As an affiliate, we earn on qualifying purchases.
As an affiliate, we earn on qualifying purchases.
Sealing Gaps and Ventilation: The Hidden Keys
Sound leaks through gaps around doors, outlets, and vents, undermining your efforts to contain noise and improve acoustics. Sealing these gaps with weatherstripping or acoustic sealant creates a more controlled environment, reducing unwanted sound transmission and reflections. Why does this matter? Because even tiny cracks can act as pathways for sound to escape or enter, defeating your acoustic treatment efforts.
But a closet rig also needs proper airflow. Trapped heat can overheat your hardware and degrade sound quality over time. The solution? Use passive vents or quiet exhaust fans to keep air moving without introducing noise. Some builders install small ducted fans with soundproofing modifications—these help maintain a stable temperature while keeping noise levels low. Proper ventilation prevents overheating, which can cause hardware throttling or damage, and ensures your recordings stay consistent in quality.
For example, a streamer installed a vented panel with a ducting fan, maintaining a cool, quiet environment even after 8 hours of continuous use. This setup illustrates that sealing gaps and managing airflow aren’t mutually exclusive—they’re both essential for a reliable, high-quality rig. The tradeoff involves balancing airtightness with adequate ventilation, but neglecting either can compromise your setup’s performance and longevity.
DIY vs. Professional Closet Booths: What Works Best?
DIY solutions like blankets, foam, and thick curtains are popular for a reason: they’re affordable and quick to implement. You can build a decent booth by draping blankets over a clothes rack and attaching foam panels with minimal effort. This approach allows for immediate improvements and flexibility, making it ideal for those on a budget or experimenting with their space.
However, professional soundproof booths utilize mass-loaded panels, airtight seals, and active ventilation systems, which significantly enhance noise isolation and acoustic consistency. They are designed to minimize sound leakage and provide a controlled environment, often with custom construction tailored to your needs. The tradeoff? Higher cost and longer setup time, but the result is a more reliable, studio-quality space that can withstand professional demands.
For example, a YouTuber built a DIY closet booth with thick blankets and found it reduced echo significantly but still leaked some noise. Upgrading to a semi-permanent setup with sealed panels, a vented door, and proper insulation made a dramatic difference, turning a casual setup into a professional-sounding environment. The key is understanding your goals and budget—DIY solutions are practical first steps, but investing in professional construction pays off if you need serious soundproofing and consistent quality.
Common Mistakes That Make Your Closet Sound Worse
Don’t just slap foam all over without considering the overall acoustic environment. Over-absorbing can deaden your sound, making it unnatural and dull, especially if the space becomes too echo-free. Instead, aim for a balance—use irregularly shaped panels or bass traps in corners to break up standing waves and prevent bass buildup, which can cause a boomy, muddy sound. Understanding the physics of sound waves helps you avoid creating a space that’s overly dead or overly reflective.
Sealing gaps is often overlooked but critically important. Even tiny cracks around doors, outlets, or vents can leak sound, undermining your entire effort. Proper sealing ensures that sound doesn’t escape or enter through unintended pathways, maintaining the integrity of your acoustic treatment. Neglecting ventilation can lead to heat buildup, which not only damages hardware but also degrades sound quality through increased noise and thermal effects. Ensuring proper airflow with quiet fans or passive vents is essential for long-term performance and comfort.
For example, a streamer sealed her closet door completely but left gaps around the outlets. The noise still leaked out, and her recordings suffered from echo and background noise. Sealing those gaps and adding ventilation improved her setup dramatically, emphasizing that attention to detail in sealing and airflow is just as important as adding foam or panels. The tradeoff is between airtightness and ventilation—both are necessary for an effective, durable setup.
Your Closet Rig Checklist for Better Sound
- Position the mic facing the least reflective surface — usually the back wall.
- Place absorption panels at reflection points on side walls and ceiling.
- Use bass traps in corners to tame low frequencies.
- Seal gaps around doors, outlets, and vents with weatherstripping or acoustic sealant.
- Ensure proper ventilation with passive vents or quiet exhaust fans.
Frequently Asked Questions
Can I completely soundproof a closet for recording?
Complete soundproofing is tough and expensive. Most closet setups improve echo and clarity but won’t fully block outside noise without professional construction. Sealing gaps and adding mass helps, but expect some leakage.What’s more important: dampening or soundproofing?
Dampening reduces echo and reflections inside your space, making recordings clearer. Soundproofing blocks sound from leaving or entering. For a quiet closet, focus on placement and sealing first, then add dampening to improve clarity.Where should I put acoustic panels inside my closet?
Treat the reflection points: behind the mic, side walls, ceiling, and corners. Focus on the back wall behind the mic and the side walls for early reflections, then add bass traps in corners to control low frequencies.How thick should panels be for a small closet?
2-inch panels are usually enough for midrange and high frequencies. For low frequencies, add bass traps in corners — these are often 4 inches thick or more. The key is placing the right treatment at critical points.Is a closet good for vocals or just for podcasts?
A closet can be great for vocals, voice-over, and streaming if treated properly. It reduces echo and reflections, but for optimal soundproofing, sealing gaps and managing ventilation are essential.Conclusion
Turning a closet into a recording or AI rig space isn’t just about slapping foam on the walls. It’s about smart placement, sealing gaps, and managing heat. When you focus on these practical steps, your closet becomes a surprisingly effective, quiet sanctuary for your work.
Remember, the best soundproofing isn’t just about absorbing noise — it’s about controlling where and how sound travels. Think of your closet as a tool, not a trap, and use placement and ventilation to your advantage.